
In my tutorials on stem stitch, raised stem band and buttonhole stitch I briefly mentioned how you could smoothly switch between these stitches. As I use this a fair bit, I wanted to go into more detail to make sure it’s clear. So I’ve put together a quick eye embroidery pattern to demonstrate!
I think eyes make for a fascinating art subject. There are often thought of as the window to our souls after all!
So I created an embroidered eye to accompany my post about looking after your eyes. And happily realised that these three stitches would work really well for it.

Rule for smooth stitch switching
What makes these three stitches easy to switch between is that they all have a slant to them. So to ensure that we can easily switch, we have to make sure our stitches are all slanting the same way.
I’ve come up with a “follow the compass” rule for each stitch that helps me to do this.
Here’s a reminder of what it is for each stitch, so that their slant is always bottom left to top right.

Eye embroidery pattern
Click below for the printable pattern. If you’d like a PDF document with the pattern and instructions all together, just pop your email address in the ‘Stay in the loop’ form at the bottom of this post.
Please note that this pattern is for your personal use only. It may not be used for any commercial purpose without prior written consent from me, Alex Law.
In the following instruction photos, I’ve used 2 shades of blue crewel wool (that I’ll refer to as mid and dark) and a little white. You can of course choose any colours you like! Or any other embroidery thread such as stranded cotton or cotton pearl/perlé.
Eyelid crease
Stitch this line in split stitch with your mid shade.
Iris
Stitch buttonhole stitch in a round with your mid shade. Start in the top left where it meets the eyelid and stitch anti clockwise. Where the eyelid covers the eye, use straight stitches to fill the iris without the buttonhole edge.
Pupil
Outline the pupil using split stitch with your dark shade. Then complete the pupil using satin stitch with your dark shade.
Using white, stitch a couple of small straight stitches near the top of the pupil to create the eye highlight.
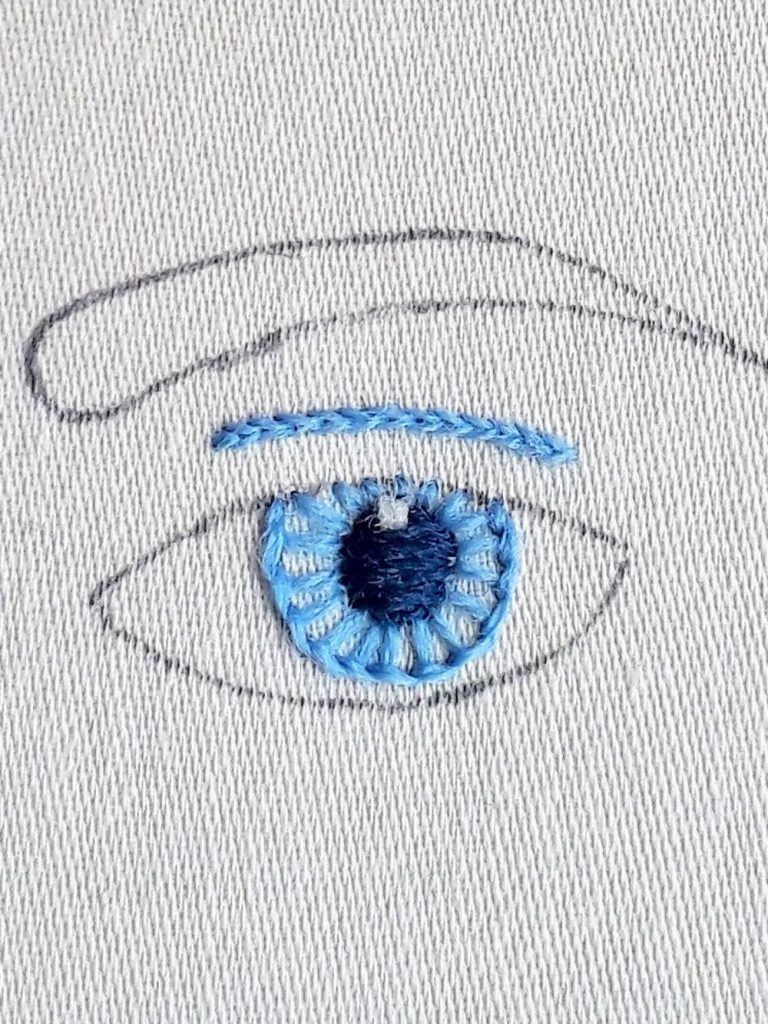
Eyelashes
Start outlining the bottom eyelid using buttonhole stitch to create the eyelashes in your dark shade, beginning at the outside corner.
Keep these stitches approximately the same length. You don’t need to be too fussy here as a little variation adds to the natural feel of the eye. As I curved around the eye, I made my stitches a little shorter.
Once you’ve stitched beyond the eye iris, switch to stem stitch. This is how I switched between stitches:

Finish your stem stitch in the inner corner of the eye, then start a new line of stem stitch to work the upper eyelid.
When you are a stitch or two away from the eye, stitch to buttonhole stitch to create the eyelashes. This is how it looks when I’m switching:

Start with short buttonhole stitches that extend just beyond the eyelid crease. As you get to the outer edge of the eye, lengthen your stitches while keeping the width between stitches about the same.
At the outer corner, secure your last stitch with a small holding stitch.
Eyebrow
Most of the eyebrow is stitched with raised stem band. Start by working your ladder stitches around the eyebrow with your dark shade. Changing the angle as needed to smoothly sweep around the curve.
Starting from the bottom left, fill the eyebrow in with raised stem band. When you get to the end of your first row, continue stitching in stem stitch along the bottom outline. Stopping when the brow tapers to a single line.

Work all of your stem band rows starting from the left hand side. Since the eyebrow tapers to the right, some of your rows will only be partial rows. For these, tuck your needle under previous stitching to disguise the row end.
For one or two of your middle rows, extend beyond your ladder stitches a stitch or two with stem stitch to help fill in the tapering end.
With your last row, continue with stem stitch to the end of the eyebrow point to create the smooth upper outline.
Your embroidered eye is now complete!
Perhaps you could stitch a collection of eyes in different colours. I’ve stitched a version using black and brown thread. I think it would also look great in some bolder colours, maybe pink and purple or green and yellow??

PDF of the eye embroidery pattern
Would you like a free PDF copy of the eye embroidery pattern and instructions for easy reference? I’ve also added in some extra in progress photos for you.
Just pop your name and email in the form below and you’ll be emailed a copy.
I’d love to see your stitched eye! You can tag me on Instagram @elara.embroidery or drop me an email at hello [at] elaraembroidery [dot] com (with the email formatted in the usual way).
Could you please send me the directions for the embroidered doll eyes? Thank you so much for your instructions and guidance.
Hi Anita, thanks for getting in touch! If you pop your first name and email address into the ‘Stay in the loop’ section at the bottom of the article, just above the comments section, then a PDF of the eye instructions will automatically be sent to you. Enjoy!
Looking forward to this project
Hi Marlene, great to hear from you! Enjoy the project 🙂
Muito lindo. Obrigado por ensinar.
You’re welcome! 🙂
This is exactly what i was searching for, i always struggle to get the faces look natural, thank you for shearing the face creations! I appreciate you!
Fabulous Janett! I’m very happy to hear you found this useful!