
I’ve had a couple of requests for this tutorial, so I hope I do it justice! I’m not surprised as long and short stitch is the key stitch used in the silk shading technique. You might also have heard of it called thread painting or needle painting. It’s one of the techniques that really excited me when I started looking at embroidery beyond cross stitch.
While the concept might seem simple, I’ve found it’s taken me a while to start to get to grips with this stitch. To get it to the standard I’d like anyway, and there’s still plenty of room for improvement!
Before I start getting into the tips I’ve picked up, let’s cover the basics.
A good foundation
I usually start long and short stitch with a different stitch entirely – split stitch.
I use split stitch to help me get a nice smooth edge to my long and short stitch. It also helps to create depth in my embroidery.
However, not every edge will need split stitch. It depends on the effect you’re going for. If you want to create a nice, smooth edge then split stitch should help you.
In my example, I’m stitching a square with vertical stitches. Since the sides of my square are at the exact angle of my stitches, I’m not going to use split stitch on these sides. It would just get in my way.

However, if I was going to work this square with anything but vertical (or horizontal) stitches, then I would use split stitch around all four sides.
Long and short stitch
For the first “row” of long and short, work your stitches coming up inside your shape and going down over your split stitch edge. You want to tuck your needle slightly under the split stitch to create a nice neat, smooth edge.
I like to start stitching in the middle of my shape. I work out to one side before coming back to the middle and working out to the other side.

In this row you want to create stitches of different lengths by staggering the start points. Although it’s best not to make any of your stitches too short as they could give you problems later. I find it helps to think about creating stitches that are long and longer.
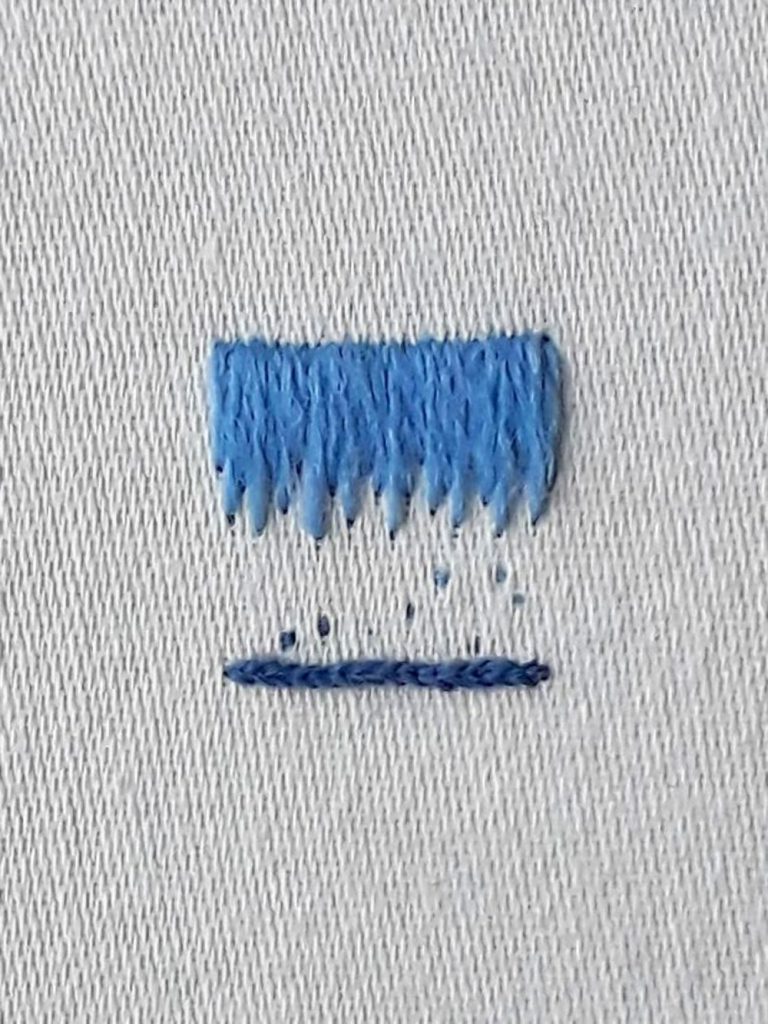
To continue filling your shape, start your stitches by bringing your needle up through one of your previous stitches. Similar to split stitch. Then end your stitches by going down into your shape.
As you are filling your shape, your stitches should all be the same length. Or at least similar.

The key is to stagger where your stitches start. This is what will create a smooth an even look to your stitching. If you don’t stagger your stitches enough, you’ll start to see rows of stitches forming instead.
Keep filling your shape with staggered stitches that are all about the same length. When you reach the edge of your shape, finish your stitches by tucking your needle slightly under your split stitches to create a nice smooth edge.


Long and Short Stitch Tips
It’s a stitch that I’ve found I can get rusty at. So regular practice helps me.
It’s also one of those techniques that often goes best when you aren’t thinking too much about it! Some stitchers swear by a glass of wine (taking care not to spill any on your work of course!). I like listening to uplifting music or fun podcasts. Anything that helps me stay relaxed.
When I first started with the silk shading technique, I didn’t stagger my stitches enough. I was surprised how extreme you can go here.
It can be fun to stitch some samples, especially while you’re getting used to the technique. I’m a big Disney fan, so I practised with these Mickey shapes.

You can see in the top Mickey that I wasn’t staggering my stitches anywhere near enough. I believe this was partly because I was thinking about rows of stitching.
That’s also the case in the ears of the second Mickey. Then in the lower half, my stitching starts to look better. I was no longer thinking about rows of stitching and instead I was just thinking about how to evenly fill the space.
It’s helpful to draw some guidelines on your fabric to help get your stitch direction right.
For curved shapes, it’s helpful to shorten your stitches as you’re going around the curve. This allows you to change the angle of your stitches more gradually, creating a smoother finish.
To get the smoothest looking stitching, use just one thread in your needle.
While stranded cotton is probably the most commonly used thread, I really enjoy working this stitch with crewel wool. The thread is thicker, making it much easier on my eyes. Plus I also find that the wools are quite forgiving in terms of smoothly blending together.
Silk shading
Silk shading is an technique that uses long and short stitch to create detailed embroideries. Often aiming for a realistic effect. It’s a popular way of stitching flowers and animals.
Here are some examples of my silk shading stitching.

I used tapestry silk shading (all the stitches are vertical) and stranded cotton for the dress in my reach for the stars design. Stitch your own with the pattern or kit.

For this wolf I used natural silk shading (the stitch direction reflects the natural form of the subject) and crewel wools. I’m writing up the pattern, so watch this space to stitch your own!
To really perfect your silk shading, I’ve found Marg Dier’s Silk Shading book to be a great resource. It has lots of helpful tips, exercises and inspiration – Marg’s work is simply stunning!
This post contains affiliate links. As an Amazon Associate I earn from qualifying purchases. Any money earned helps to cover the costs of running this blog. Chocolate’s essential for running a blog, right?
Very helpful. I’m getting ready to soft shade a deer. I’m really apprehensive about starting. Really don’t know where to begin as head or body first. But this did help on the stitch length etc.
Glad this is helpful Caroline! There’s a lot to cover with silk shading, so I might work on an additional guide. A good rule of thumb with silk shading is to start with the parts of the design that are further back and work your way forward. I’m guessing that for your deer, the body is probably behind the head, in which case I’d begin with the body. Good luck with it, I’m sure it’ll turn out great!
You make it look so easy! I’ve found practice makes the difference. Thanks💙💙💙🥰
Thanks Michelle! It’s definitely taken a lot of practice and I always find it quite tricky again if I haven’t stitched it for a while.
Thank you. As ever, really helpful- I’m finding it a very difficult stitch to learn. Seeing your examples where it didn’t quite work very helpful too!
Great to hear Mel, thank you! It’s definitely a tricky one, I still feel like I need lots of practice! Good to hear those examples are useful, I often find I can learn quicker by getting things wrong and figuring out what needs adjusting.
Hi Caroline
I am new to embroidery. I am in the process of making the spot the dog. I just have the body to fill now with yellow, have embroidered the edging in black cotton. Would you fill the body with vertical or horizontal stiches. Can you advise please.
Hi Marie,
I’m hope you’re enjoying the embroidery journey so far! It’s hard to advise without knowing the specifics of your design or what look you’re hoping to achieve. However, generally for stitching animals with fur in long and short stitch, a good place to start would be using the direction of the fur to guide your stitching direction. Or simply go with your gut instinct!
On the other hand opposite from some of your commenters, I have been stitching embroidery since I was 4 years old and am a senior citizen. I demonstrate 18th style embroidery at reenactment events. While I have done the long and short stitch for decades I was looking online as the piece I am working on a events uses the stitch for a good deal of the piece. What I stitched before this year (since I work at events the piece I work on at same takes years to finish) is fine. But what I stitched at 2 events ago I had to rip out (luckily found matching crewel yarns in my stash). I went to restitch the section at our last event and found the same problem – it looked more like separate stitches next to each other than a melded together filling of the area. Stopped quickly and played around with the piece in my hand instead of actually stitching as any threads I had with me to stitch with were for sections that were long and short stitch. (I bring a limited assortment of yarns to events and they are set up on reproduction bobbins so I only have the yarns to work on what I plan to do at the event so I could not work on a section with a different stitch.) I again took it apart at home.
We have an event coming up Sunday and I was looking online to figure out what I have been doing wrong. Stupid me. Instead of going across with a row of varied length stitches, I have been working the stitches in a row up the section and then working my way back to where I started, repeat.
Thanks to seeing your post about the stitch it reminded me what I was doing wrong after all these decades of stitching!
Hi Meryl, wow, I love that you demonstrate 18th century style embroidery at reenactment events, people must find that really fascinating!! I’m so glad to hear that my post has helped you! I think long and short is one of those stitches where I’ll forever be working on improving it 😂
Hope you have a great event on Sunday!
Sorry I did not get back here sooner.
We did have a good event – then again, as long as I am stitching, the public is there and interested, the weather is good, the bathrooms usable, and I am not stuck doing the cooking demo (which is also mid day “dinner” for those in the unit) it is a good event.
I managed to stitch 3 petals during that day – a lot of the day my mouth is going more than my fingers plus husband is demonstrating weaving with a modern small loom – he sells his weaving and if he is not around and someone is interested in something I deal with that also, as well as talking about the weaving if someone interested in knowing about it when he is not there. He has other jobs to do also – such as the children’s military drills for children from the public as he is second in command (he was first in command – but as he aged it was too much, so a younger fellow took over as a commander and they split the work with husband doing more of the paperwork and less running around at events). I am actually third in command of the unit – but stay away from the drills and such and leave same to the fellows.
One of the petals I am very happy with. The other two I am satisfied with – especially compared to the mess I was stitching at the last event.
The piece is a reproduction kit I bought at Colonial Williamsburg some decades ago. It is a chair seat cover (as in a dining room chair). I find it interesting as it uses crewel yarn, cotton floss, and silk floss. (In period cotton was a relatively expensive thread/fabric as the cotton gin was not yet invented and the work to pick it, clean it, and make it into thread all had to be done by hand.) I assure you that no one will sit what I am stitching!
As to the cooking demo mentioned – when we first joined in the 1980s a group of 3 older ladies did the cooking. Then they could no longer do so. I was asked if I could do it – I replied I could that I certainly could do the demo, but how edible it would be…? I then was stuck cooking for about 20 or so years until a fellow joined who wanted to cook and then I was able to go back to stitching. I realized last year that I am now about the age of those “older ladies”!
Hope I have not run too much!
Hi Meryl,
Sorry for the slow response and thank you for the details of your events! It’s fascinating to hear about it all and it sounds like you’re part of a very passionate team! I’m sure the people who visit have a wonderful day and it’s so great that you’re keep the history, particularly of the crafts, alive. It’s great to hear that you’re happier with your stitching from this event. I’m sure it’ll be a beautiful seat cover and it is indeed interesting to learn about the mix of threads that the design uses. I love getting a close up (ish!) look at antique stitched upholstery when I visit country houses etc.
Thanks again for sharing and wishing you very enjoyable stitching and events for the future!